The secret to sharp, atmospheric temple photos without a tripod isn’t a magic setting, but a holistic system combining physical stability with intentional camera technique.
- Master physical bracing by using your body and environment as a human tripod for enhanced stability.
- Configure camera settings (IBIS, Back-Button Focus, Burst Mode) into a deliberate workflow for handheld shooting.
- Employ « subtractive » editing techniques to enhance light by strategically darkening shadows, not just brightening rays.
Recommendation: Stop hunting for a single perfect setting and start practicing this integrated system of body, camera, and post-processing to transform your low-light photography.
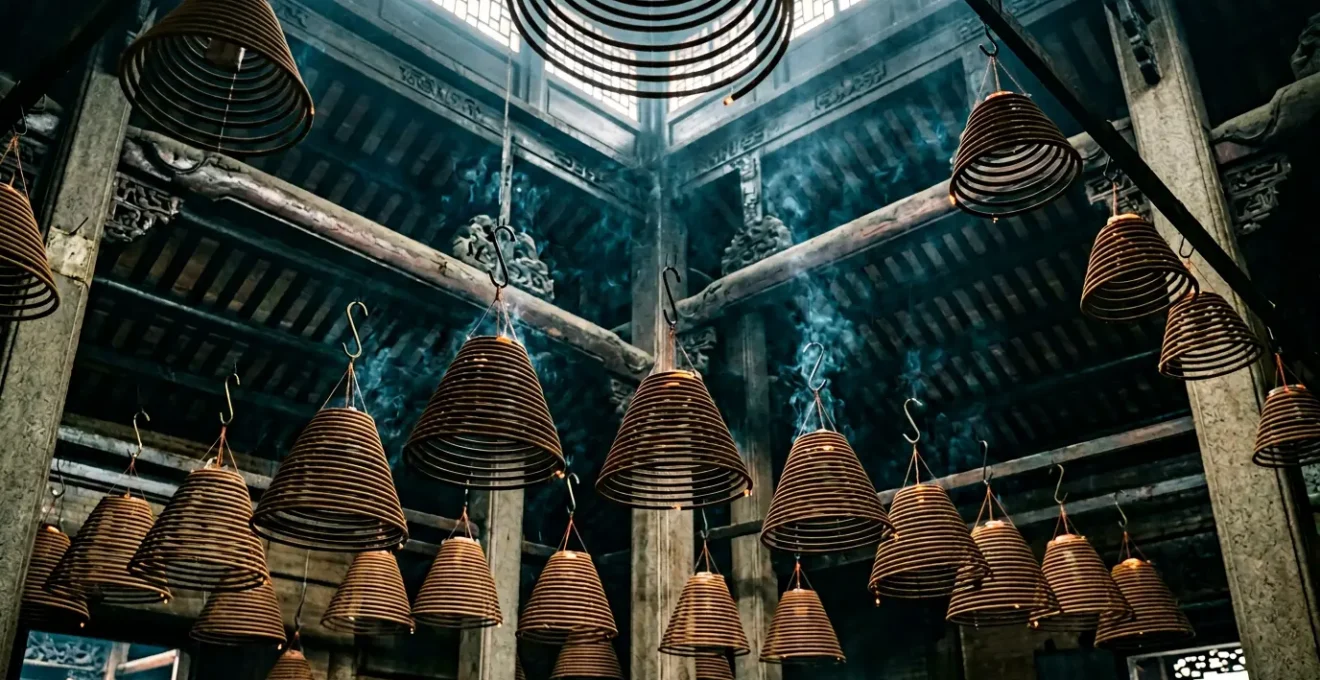
You’re standing in the heart of Man Mo Temple. The air is thick with a fragrant, swirling haze, and massive incense coils hang from the ceiling like celestial chandeliers. Sunlight pierces the gloom, creating ethereal « god rays » that dance in the smoke. It’s a photographer’s dream, but your shots are coming out blurry, noisy, or flat. The temptation is to use a flash, but that would destroy the sacred atmosphere and is often disrespectful. You can’t use a tripod; it’s cumbersome and usually forbidden in crowded, sacred spaces.
Many guides will give you the standard low-light advice: use a fast lens, crank up the ISO, and shoot in RAW. While correct, this advice is incomplete. It treats the problem as a simple settings issue, ignoring the fundamental challenge of handheld shooting in such a dynamic environment. Capturing the soul of a place like this requires more than technical adjustments; it demands a change in approach, a mastery of your equipment and your own body as a single, stable photographic unit. This is about transforming yourself from a passive picture-taker into an intentional image-maker.
This guide abandons the tripod crutch. Instead, it will equip you with a holistic system. We will explore the cultural significance of the smoke and coils to inform your storytelling. We’ll then dive deep into the practicalities: the health considerations of the smoke, the specific camera techniques for handheld stability, and a powerful, counter-intuitive editing workflow. You will learn to see the light, understand the culture, and capture the ephemeral beauty of the moment with clarity and confidence.
This article breaks down the essential knowledge for any photographer looking to master this unique challenge. From the cultural context to the technical execution, each section provides a piece of the puzzle for creating compelling images in one of photography’s most beautiful and difficult environments.
Table of Contents: A Guide to Low-Light Temple Photography
- Why Can Temple Smoke Trigger Asthma Attacks in Sensitive Travelers?
- Why Do Incense Coils Hang From the Ceiling for Weeks at a Time?
- Which Type of Incense Is Appropriate for a Tourist to Burn as an Offering?
- How to Edit Temple Smoke Photos to Enhance the « God Rays » Effect?
- Do Locals Believe the Smoke Carries Messages to the Heavens?
- Is the Smoke at Man Mo Temple Too Intense for Children?
- Do You Need Goggles to Watch the Fire Dragon Dance?
- Why Is the Tai Hang Fire Dragon Made of Straw and Incense?
Why Can Temple Smoke Trigger Asthma Attacks in Sensitive Travelers?
The beautiful, atmospheric smoke that makes temples so photogenic is, unfortunately, a significant source of air pollution. The haze isn’t just water vapor; it’s comprised of fine particulate matter, specifically PM2.5, which are tiny particles less than 2.5 micrometers in diameter. When inhaled, these particles can penetrate deep into the lungs and even enter the bloodstream, causing respiratory irritation and inflammation. For a photographer spending an extended period inside to get the perfect shot, this exposure can be considerable.
For individuals with pre-existing respiratory conditions like asthma or chronic obstructive pulmonary disease (COPD), this environment is particularly hazardous. The high concentration of airborne irritants can act as a direct trigger for an asthma attack, leading to symptoms like coughing, wheezing, shortness of breath, and chest tightness. Even travelers without known sensitivities may experience discomfort such as a sore throat, stinging eyes, or a persistent cough after prolonged exposure.
The science backs this up with alarming data. Research shows that PM2.5 concentrations inside temples can reach 401.44±220.46 μg/m³, exceeding established air quality safety standards by a staggering 5 to 18 times. This isn’t just a minor inconvenience; it’s a genuine health risk that must be managed. For photographers, this means planning your visit: go during off-peak hours when crowds and incense burning are lighter, wear a high-quality N95 or KN95 mask, and take frequent breaks outside in the fresh air. Prioritizing your health is the first step to a successful photo session.
Why Do Incense Coils Hang From the Ceiling for Weeks at a Time?
The iconic, enormous incense coils hanging from temple ceilings are more than just a source of smoke; they are a profound fusion of spiritual intention and practical design. Their primary purpose is to facilitate prolonged burning. Unlike standard incense sticks that burn out in under an hour, these large spiral coils, known as Pán Xiāng (盘香), are engineered to smolder for days, or in the case of the largest temple-grade coils, for several weeks. This extended duration is deeply symbolic.
A worshipper sponsors one of these coils to represent a long-term, persistent prayer or wish. It could be for the health of a family member, success in business, or good fortune over a long period. As the coil slowly burns, its smoke continuously carries this wish upwards, serving as a constant, unwavering petition to the deities. The slow, steady consumption of the coil is a physical manifestation of enduring faith and devotion. This temporal aspect adds a powerful layer of narrative to your photographs.
Case Study: The Engineering of Pan Xiang (Coil Incense)
Pan Xiang coils are designed for prolonged burning through their spiral construction. While standard home-use coils might burn for 2-4 hours, the massive temple-grade coils are crafted to burn continuously for weeks. This extended duration symbolizes persistent, long-term prayers. As confirmed by documentation on traditional Chinese incense, the ceiling-suspension design is a brilliant architectural solution. It maximizes limited floor space in crowded temples while protecting the slow-burning, delicate coils from accidental disturbance by the throngs of worshippers below, merging practical engineering with deep spiritual purpose.
Photographing these coils means you are capturing a story in progress. A freshly hung, tightly wound coil represents the beginning of a hope, while a nearly finished one, reduced to a fragile spiral of ash, signifies the culmination of that long-held prayer. The design is also a practical masterpiece, saving precious floor space in bustling temples and keeping the smoldering embers safely away from the crowd.
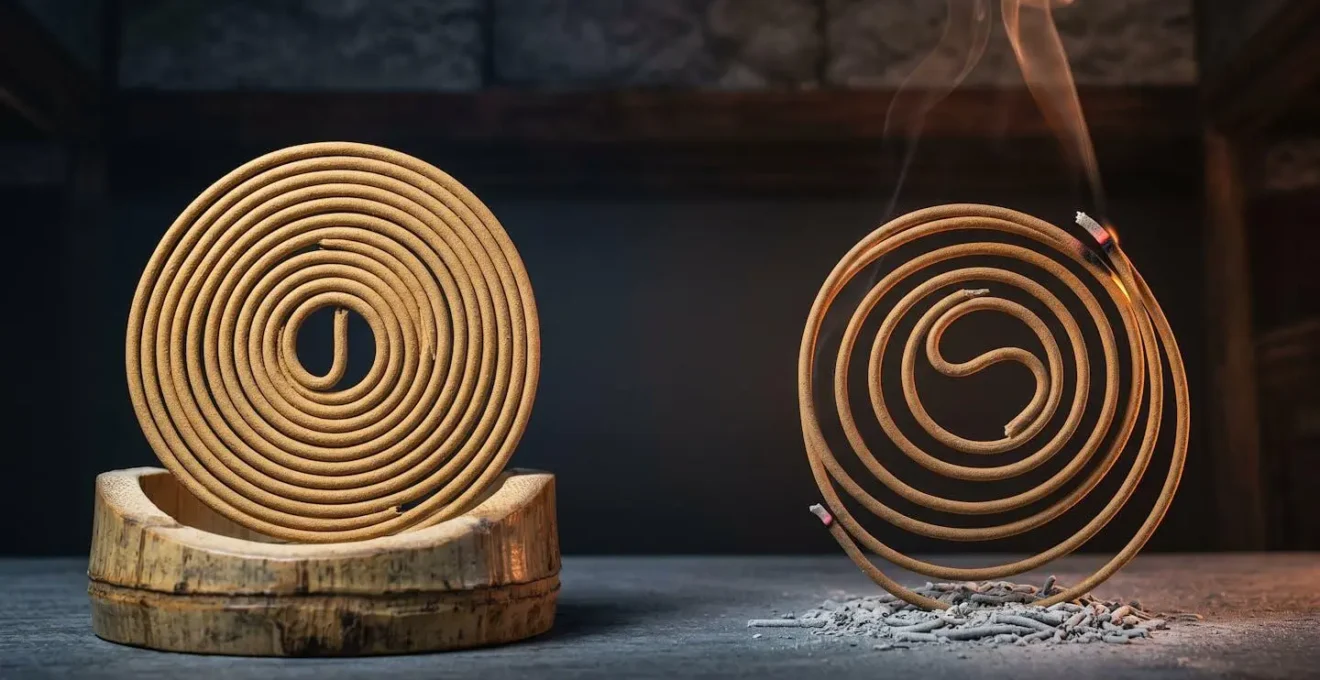
As this image illustrates, placing a new coil next to a nearly consumed one creates a powerful visual metaphor for the passage of time and the lifecycle of a prayer. This contrast between beginning and end is a compelling narrative you can seek out and capture, adding depth and meaning to your temple photography beyond a simple atmospheric shot.
Which Type of Incense Is Appropriate for a Tourist to Burn as an Offering?
As a visiting photographer and respectful tourist, participating in the ritual of burning incense can be a meaningful experience that connects you more deeply with the culture you are documenting. However, choosing the right type of incense is important. While you won’t be expected to sponsor a massive, week-long coil, understanding the common options available for purchase at the temple entrance allows you to make an appropriate and photographically interesting choice.
The most common and accessible type for a tourist is the stick incense, or Xiàn Xiāng (线香). These are thin sticks that are typically bundled together, lit, and placed upright in large sand-filled censers or urns. They burn for a relatively short period (30-45 minutes), symbolizing a quick, immediate prayer or a gesture of respect. Photographically, they are fantastic for capturing moments of active worship, as they create dynamic, vertical smoke trails and their clustered arrangement in the censers makes for a powerful, textured composition.
For a photographer, the choice of incense can also be a creative one. Each type offers different visual qualities—from the thin, dancing lines of stick incense to the heavy, architectural presence of a coil. The following guide breaks down the key characteristics to help you choose an offering that is both culturally appropriate and visually compelling for your photographic goals.
| Incense Type | Chinese Name | Burn Duration | Symbolic Meaning | Photographic Qualities | When to Choose |
|---|---|---|---|---|---|
| Stick Incense | 线香 (Xiàn Xiāng) | 30-45 minutes | Quick prayer, immediate blessings | Thin vertical smoke trails, dynamic movement, clustered in censers | Short temple visits, capturing active worship moments |
| Spiral Coil Incense | 盘香 (Pán Xiāng) | 2-4 hours (small) to weeks (large) | Long-term wish, persistent prayer | Architectural hanging forms, glowing embers, heavy atmospheric smoke | Documenting temple atmosphere, symbolic storytelling shots |
| Pagoda Incense | 塔香 (Tǎ Xiāng) | 1-2 hours | Layered blessings, multi-generational prayers | Cone shape, concentrated smoke column, geometric form | Close-up detail shots, minimalist compositions |
Ultimately, choosing simple stick incense is the most common and failsafe option for a tourist. It shows respect, allows you to participate in the local customs, and provides excellent opportunities for capturing the dynamic, human element of worship within the temple.
How to Edit Temple Smoke Photos to Enhance the « God Rays » Effect?
Capturing the « god rays »—or more technically, crepuscular rays—is one thing, but making them truly stand out in a photograph requires a specific and often counter-intuitive editing approach. The common impulse is to increase the brightness or highlights of the light beams themselves. However, the most effective method is actually subtractive editing: you make the rays appear brighter by carefully darkening the areas *around* them. This creates contrast and depth, allowing the natural light to take center stage without looking artificial.
This technique is about sculpting the light that is already present in your RAW file. The goal is not to create light from scratch, but to enhance the natural interplay between light and shadow that the smoke makes visible. By darkening the smoke and shadows between the rays, you guide the viewer’s eye and add a dramatic, three-dimensional quality to the image. As Adobe Quality Engineer Rikk Flohr advises in a discussion on the topic, the key is to work on the negative space. He notes:
Use the Target Adjustment Tool set to Luminance and click and pull down in the area between the sun’s rays to darken surrounding zones and make light beams more prominent.
– Rikk Flohr, Adobe Quality Engineer discussion on Lightroom Queen Forums
This principle of darkening the surroundings is the foundation of the professional workflow. It requires a delicate touch and a focus on maintaining the natural texture of the smoke. Over-editing can quickly make the effect look fake, so subtlety is paramount. The following checklist provides a step-by-step method for achieving this in a program like Adobe Lightroom.
Your Action Plan: Naturally Enhancing God Rays
- Pre-adjustment: Darken the overall image exposure by -0.5 to -1.0 stops to create a contrast foundation for light beams to ‘pop’ against.
- Identify natural rays: Locate existing light beams in your raw file (even faint ones) rather than fabricating entirely artificial rays.
- Radial gradient sculpting: Use Lightroom’s Radial Gradient tool to draw elliptical masks around areas BETWEEN the light rays, darkening shadows (-30 to -50) and reducing highlights (-20) to make surrounding areas recede.
- Enhance existing beams: Create new radial gradients directly ON the light rays, gently increasing exposure (+15 to +30) and whites (+10 to +20) while maintaining natural fall-off.
- Preserve smoke texture: Avoid over-smoothing; instead, increase Texture (+10 to +20) and use Clarity sparingly (+5 to +10) to emphasize the smoke’s wispy, layered nature without artificial sharpening.
Do Locals Believe the Smoke Carries Messages to the Heavens?
Yes, absolutely. This belief is the spiritual cornerstone of incense burning in Taoist and Buddhist traditions. The smoke is not merely a byproduct of the ritual; it is the essential medium, the sacred conduit that bridges the earthly realm with the celestial one. When a worshipper lights a stick of incense and bows, they are infusing their prayers, wishes, and respects into the fragrant smoke. The physical act of the smoke ascending is believed to be the literal transportation of that message to the gods, ancestors, or heavenly spirits.
This concept transforms your photographic subject from a simple atmospheric effect into a deeply symbolic event. You are not just capturing light and particles; you are documenting thousands of silent prayers taking flight. This understanding should inform your composition and your focus. Look for the human element: the expressions of hope on the faces of worshippers as they gaze upwards, the reverent way they hold the incense, the final act of placing it in the urn. This is where the story lies. The cultural documentation from Grand Awood Traditional Incense eloquently explains this core belief:
As the incense burns and its smoke ascends, the message is carried to Heaven, allowing the prayer to be heard. This centuries-old tradition has brought countless generations peace, comfort, and hope.
– Grand Awood Traditional Incense Documentation, Cultural explanation of incense coil spiritual significance
This idea of smoke as a messenger provides a powerful narrative for your photography. It encourages you to move beyond wide, atmospheric shots and seek out the intimate, personal moments of faith. The smoke becomes a character in the story, carrying the collective hopes of the people within the temple’s walls.
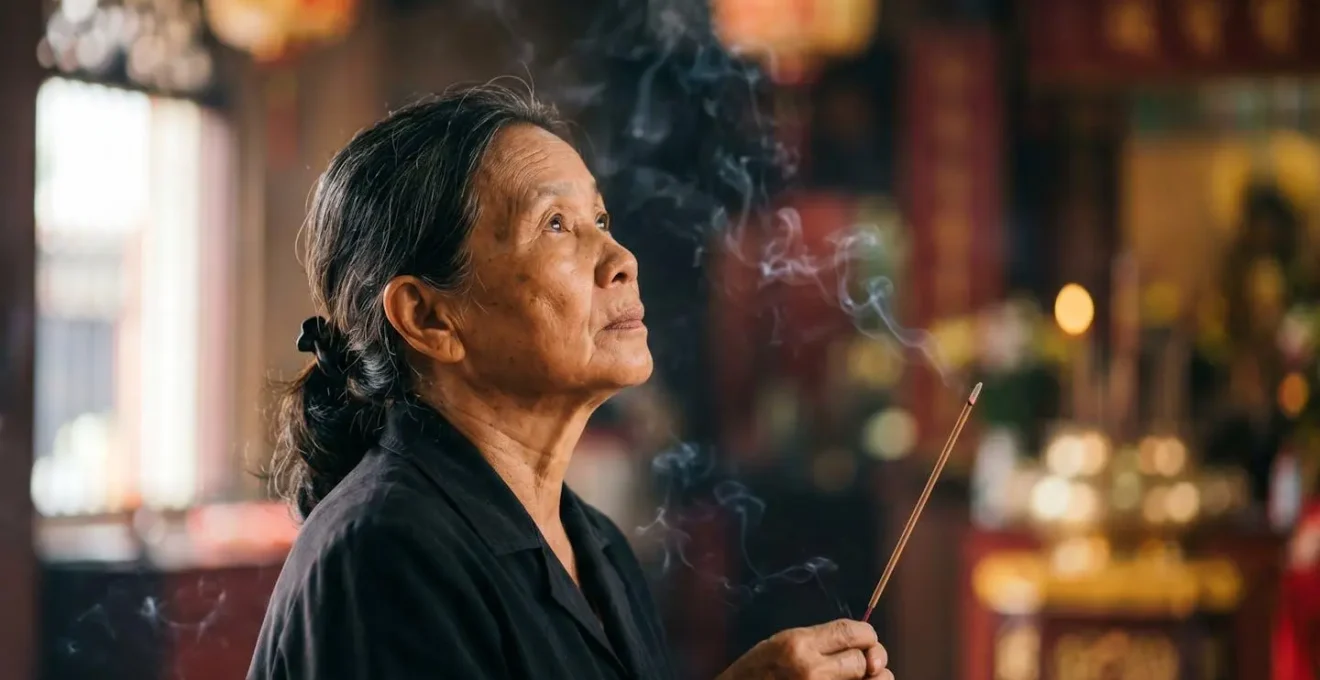
A powerful photograph, like the one depicted, focuses on this human connection. By framing a worshipper watching their prayer ascend, you capture the essence of the ritual: an act of faith, a moment of communication, and a visual representation of hope floating towards the heavens.
Is the Smoke at Man Mo Temple Too Intense for Children?
Given the high concentration of particulate matter in temple smoke, bringing children, especially infants and toddlers, into the most intense areas of a place like Man Mo Temple requires careful consideration. Children’s respiratory systems are still developing and are more vulnerable to air pollutants than those of adults. Their smaller lung capacity and faster breathing rate mean they can inhale a proportionally larger volume of harmful particles.
The anecdotal evidence from other visitors is strong. One traveler on TripAdvisor clearly stated, « Internally I found the strength of incense smoke to be quite overwhelming. This would be problematic for those with respiratory issues such as asthma. » Another confirmed the conditions, describing the air as « very thick (very thick) with incense, » especially in the main worship hall. For a child, this overwhelming environment can quickly lead to discomfort, coughing fits, or more severe reactions, particularly if they have undiagnosed sensitivities.
The risk is especially high for children with known conditions like asthma. A visit to a heavily smoked temple could easily trigger a severe asthma attack, which would be a distressing and dangerous situation while traveling. Even for healthy children, prolonged exposure can cause irritation to the eyes, nose, and throat. As a photographer and a parent, the best approach is one of caution. If you must bring children, try to visit during quieter, less smoky times, limit their time inside the most concentrated areas, and ensure good ventilation where possible. For children with any respiratory sensitivity, it is wisest to have them wait outside or avoid the temple’s interior altogether.
Do You Need Goggles to Watch the Fire Dragon Dance?
While organizers of the Tai Hang Fire Dragon Dance don’t mandate goggles for spectators, the question points to a crucial aspect of photographing such an event: personal safety and proximity to the action. The dragon, covered in thousands of burning incense sticks, is paraded through narrow streets, creating a chaotic and thrilling spectacle of sparks, smoke, and embers. Getting a great shot often means getting close, and getting close means exposing yourself and your gear to the elements.
For a photographer, the real challenge isn’t just about eye protection, but about maintaining camera control while being jostled by crowds and staying aware of flying sparks. This is where a one-handed camera operation technique becomes an invaluable skill. By mastering a secure one-handed grip, you free up your other hand to act as a protective shield for your face, to hold a mask over your nose and mouth, or to balance yourself in the crowd. This is an advanced technique that goes hand-in-hand with tripod-less, event-based photography.
To achieve this, you need to prepare your camera and your technique beforehand:
- Preparation: Attach a secure wrist strap to your camera. This is non-negotiable for security in a crowd.
- Settings Pre-configuration: Program your camera’s back-button focus. This separates the act of focusing (with your thumb) from taking the picture (with your index finger), giving you more deliberate control with one hand.
- Leverage IBIS: Activate your camera’s in-body image stabilization and set it to its maximum level to compensate for the reduced stability of a one-handed grip.
- Modified Grip: Hold the camera firmly with your dominant hand, bracing the base of it against your chest or torso to create an additional point of contact and stability.
- Burst Mode Strategy: Set your camera to a continuous shooting (burst) mode. Capturing 3-5 frame bursts for each key moment dramatically increases your chances of getting a sharp, impactful shot despite the motion and instability.
So, while you might not need military-grade goggles, thinking about protection is the right instinct. For a photographer, that protection comes from a smart shooting strategy that keeps one hand free to shield yourself, allowing you to immerse yourself in the action safely and come away with incredible images.
Key Takeaways
- The primary challenge of tripod-less temple photography is managing stability; this is achieved through a system of physical bracing and intentional camera settings (IBIS, back-button focus).
- Effective editing for « god rays » is subtractive; you enhance light by darkening surrounding shadows and smoke, not by artificially brightening the beams.
- Understanding the cultural context—that smoke carries prayers to the heavens—transforms your subject from an atmospheric effect into a powerful narrative of faith and hope.
Why Is the Tai Hang Fire Dragon Made of Straw and Incense?
The materials used to construct the Tai Hang Fire Dragon—a core of straw wrapped in pearl grass and bristling with thousands of burning incense sticks—are not chosen for longevity. On the contrary, they are chosen precisely because they are ephemeral. The dragon is born of organic, combustible materials and is destined to be consumed by fire and ritual over the course of the festival. This is not a permanent sculpture; it is a piece of living, breathing, and ultimately, dying, performance art.
This transient nature is at the very heart of its cultural and spiritual significance. The dragon’s creation and fiery procession are an act of purification and renewal for the community. Its eventual destruction is not an end, but a completion of a cycle. This philosophy of impermanence is a powerful theme for a photographer. Your job is not to document a static object, but to capture the essence of a fleeting moment. As one analysis on the photography of ephemeral rituals notes:
The materials (straw, incense) are chosen because they are meant to be consumed. This informs a photographic approach focused on capturing its fleeting nature—the glow, the smoke, the decay—before it disappears.
– Cultural Heritage Photography Documentation, Analysis of ephemeral ritual art photography in Asian traditions
This perspective ties together everything we’ve discussed. The skills of handheld, low-light photography—mastering stability, controlling your settings on the fly, and capturing motion—are precisely the skills needed to document this kind of ephemeral art. You are capturing the glow of the embers, the swirling smoke that carries away the community’s prayers, and the slow, beautiful decay of the dragon itself. Your photographs become a testament to a moment that was, by its very nature, never meant to last.
Your camera is a tool for storytelling, and now you have a complete system to tell the story of light, smoke, and faith. The next step is to move from theory to practice. Go to a challenging, low-light environment and begin to integrate these techniques—the physical bracing, the camera settings, the subtractive editing—into your own workflow. Start capturing the fleeting moments that make travel photography so powerful.