In summary:
- You don’t need professional hiking gear; essential supplies are available at the MTR station’s 7-Eleven.
- Your regular travel sneakers with decent grip are perfectly fine for this well-maintained trail.
- The path is exceptionally well-marked in English, but downloading an offline map provides total peace of mind.
- The real danger isn’t the trail difficulty but Hong Kong’s summer heat and humidity; timing is crucial.
- The reward is a swim at Big Wave Bay, and getting back to the city via minibus is simple once you know the rules.
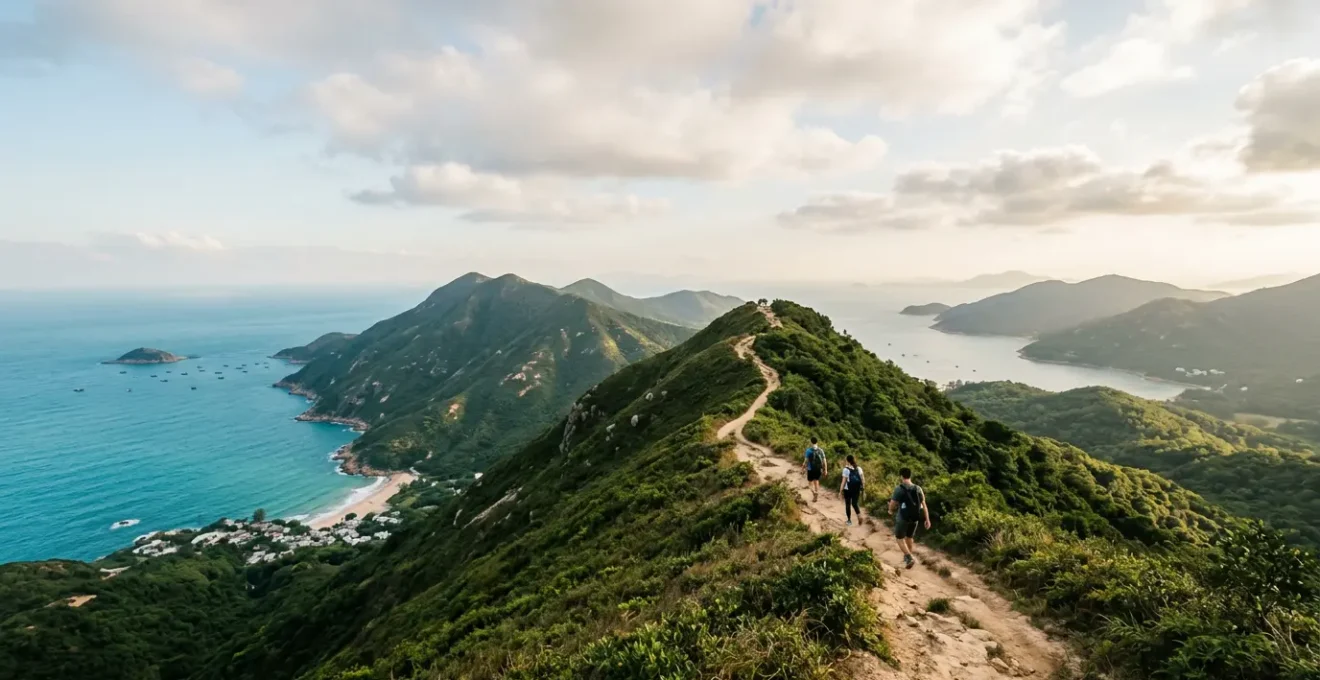
You’ve seen the stunning photos on Instagram: a winding, narrow path along a mountain ridge with panoramic views of the South China Sea. This is the Dragon’s Back, often touted as Hong Kong’s best urban hike. But for a casual walker, the idea of « hiking » in a foreign city can be intimidating. You see the term « pro hiker » and immediately think you need expensive boots, complicated gear, and the navigation skills of a seasoned explorer. Most guides simply say « it’s easy » and « bring water, » which isn’t helpful when you’re standing in an MTR station wondering which exit to take.
Let’s change the narrative. The key to conquering the Dragon’s Back isn’t about being a pro hiker; it’s about having logistical confidence. This isn’t a guide about physical endurance. It’s a mental and practical walkthrough designed to lower the « anxiety score » of your adventure. We’ll address every decision point you’ll face, from what shoes to wear (you likely already own them) to exactly how to catch the right bus back to civilization. This guide will equip you with the knowledge to navigate the entire journey—from your hotel room to the beach at the finish line—with the calm assurance of a local.
This article will walk you through everything you need to know to transform this seemingly daunting hike into a relaxed and rewarding day out. We’ll cover gear, navigation, safety, and the crucial post-hike logistics, proving that the Dragon’s Back truly is accessible to everyone.
Summary: Your Confidence-Building Guide to the Dragon’s Back
- Is the Dragon’s Back Hike Suitable for Beginners with No Hiking Gear?
- Can You Hike Dragon’s Back in Sneakers or Do You Need Boots?
- Are Hong Kong Hiking Trails Well-Marked in English?
- Why Is Hiking in July and August Dangerous for Tourists?
- How to Finish Your Hike at Big Wave Bay for a Swim?
- Red vs Green Minibus: Which One Can You Flag Down Anywhere?
- Is Bowen Road the Best Flat Running Path with City Views?
- How Long Does the Lugard Road Circular Walk Take for a Casual Stroll?
Is the Dragon’s Back Hike Suitable for Beginners with No Hiking Gear?
Let’s address the biggest worry first: yes, this hike is absolutely suitable for you. You do not need to invest in « hiking gear. » You just need to pick up a few essential « supplies. » The trail is well-maintained and doesn’t require technical equipment. According to user-submitted data, it’s rated as a moderate difficulty trail of 3 miles with 580 ft elevation gain, which for a casual walker means a manageable uphill section at the start, followed by a beautiful, undulating ridge walk.
The beauty of this hike is its accessibility. You can show up completely unprepared and get everything you need right before you start. The journey to the Dragon’s Back begins at the Shau Kei Wan MTR station. Inside this station, there’s a 7-Eleven that acts as your pre-hike outfitter. This is where you transform from a tourist into a prepared walker.
Here is your simple shopping list. No specialty outdoor store required:
- Water: 2 liters minimum. Don’t underestimate this. Buy two large 1-liter bottles.
- Electrolytes: Grab one sports drink like Pocari Sweat or Aquarius. This is crucial for replacing salts lost through sweat in Hong Kong’s humidity.
- Snacks: An energy bar, a bag of nuts, or even a pre-made sandwich for a boost on the trail.
- Sun Protection: If you forgot it, buy a small bottle of sunscreen. The Hong Kong sun is intense, even on cloudy days.
With a total cost of around 50-70 HKD, you are fully equipped. The idea isn’t to be a pro hiker with expensive gear, but a smart walker who is well-hydrated and energized. As the Drone & DSLR Travel Guide puts it, the experience is designed to be accessible.
The hike is relatively easy with fairly minimal climbing to reach the ridge.
– Drone & DSLR Travel Guide, Dragon’s Back Hike, Hong Kong – The Complete Guide
By focusing on simple supplies rather than specialized gear, you remove the primary barrier to entry and can approach the trail with confidence.
Can You Hike Dragon’s Back in Sneakers or Do You Need Boots?
The next big question is always about footwear. Do you need to pack bulky hiking boots that take up half your suitcase? The answer is a resounding no. For the Dragon’s Back, your trusty travel sneakers are perfectly adequate. The trail is mostly a hard-packed dirt path with some stone steps; it is not a technical rock scramble that requires rigid ankle support.
Weight is a more significant factor than ankle support on this trail. Hiking boots are heavy and can feel like a burden on a relatively short 2-3 hour walk. The goal is to be light and comfortable. However, not all sneakers are created equal. The key factor is tread. Fashion sneakers with completely flat soles are a poor choice, as they offer no grip. Take a look at the bottom of your shoes. If they have some form of pattern or grooves, you’re good to go.
To help you decide, here’s a simple framework for your footwear choice:
- Good: Your everyday travel sneakers with a decent sole. As long as the tread isn’t worn flat, they will handle the maintained path of Dragon’s Back without issue.
- Better: Any pair of running shoes. They are designed for impact and typically have better grip patterns on the sole, which will give you more confidence on the few steeper or uneven sections.
- Best: Trail runners. These offer the optimal combination of lightweight comfort and aggressive tread for grip. However, do not buy these just for this one hike; they are overkill if you don’t plan on more serious hiking.
This simple piece of advice from the HikerHero trail guide sums it up perfectly.
Trainers are fine, but avoid flip-flops.
– HikerHero Trail Guide, Dragons Back: My Hike Experience + Free GPS Map
So, save the suitcase space. Your comfortable sneakers will serve you well and allow you to enjoy the walk without feeling weighed down.
Are Hong Kong Hiking Trails Well-Marked in English?
Navigating in a new country can be a major source of anxiety. The fear of taking a wrong turn and getting lost is a valid concern for any traveler. Here is the good news: Hong Kong’s country parks are managed to an incredibly high standard. The Dragon’s Back, as part of the official Hong Kong Trail, is exceptionally well-marked with bilingual (Cantonese and English) signage.
You are never far from a reassuring signpost. In fact, official documentation confirms there are trail markers every 500 meters (0.3 miles). These distance posts (numbered H085, H086, etc.) let you know you’re on the right path and help you track your progress. You simply follow the signs for « Big Wave Bay » to reach your destination. The trail is clear and unambiguous, designed for public use, not for expert pathfinders.

While the physical signs are more than sufficient, having a digital backup provides complete peace of mind. Your smartphone is your ultimate safety net. Before you even leave your hotel’s Wi-Fi, you can set yourself up for navigational success. This small amount of prep work reduces the in-hike anxiety score to zero.
Your Digital Safety Net: A Checklist for Navigation Confidence
- Offline Maps: Before leaving your hotel, open Google Maps or Maps.me. Find the Dragon’s Back area and select « Download offline map. » This ensures your GPS works even without a cell signal.
- Battery Preservation: Start with a fully charged phone. Switch it to airplane mode once you begin the hike. Your GPS will still function, but the battery will last significantly longer.
- Official Signage Only: Follow only the official government signposts that say « Hong Kong Trail » or show the distance marker codes. You may see colored ribbons tied to trees; these are unofficial markers left by local hiking groups for more obscure paths and should be ignored.
- Starting Point Verification: Use your map to confirm you’ve gotten off Bus 9 at the correct stop: « To Tei Wan, Dragon’s Back. » The trailhead is clearly marked right there.
- Track Your Progress: Occasionally check your blue dot on the downloaded map. This confirms you are on the main trail and gives you a sense of how much further you have to go.
With clear physical signs and a digital backup in your pocket, you can put all your focus on enjoying the spectacular views instead of worrying about your route.
Why Is Hiking in July and August Dangerous for Tourists?
While the Dragon’s Back trail itself is not inherently dangerous, the time of year you choose to hike it can be. Hiking in Hong Kong during the peak summer months of July and August presents a serious risk that many tourists underestimate: extreme heat and humidity. The danger isn’t about getting a sunburn; it’s about heat exhaustion or, in severe cases, heatstroke.
Hong Kong’s subtropical climate during summer is no joke. The city is experiencing record-breaking temperatures, with data from the Hong Kong Observatory showing there were 52 « Very Hot Days » and 50 « Hot Nights » recorded in a recent year. But the temperature alone is misleading. The real threat is the humidity, which prevents your sweat from evaporating and cooling your body effectively. As Hong Kong weather experts document, a temperature of 33°C (91°F) combined with 80% humidity can create a « feels like » temperature of 47.3°C (117°F). Hiking in these conditions, especially during the middle of the day, is incredibly dangerous.
This doesn’t mean you can’t hike in the summer. It just means you have to be much smarter about it. A « pro hiker » mindset here isn’t about expensive gear; it’s about strategic planning. Here is your essential survival kit and strategy for a summer hike:
- Water Intake: The standard 2 liters is not enough. For a 3-hour hike in summer, you must bring a minimum of 3 liters of water per person.
- Electrolyte Management: When humidity is high, you sweat profusely but don’t cool down. You lose critical salts. You must pack electrolyte powders or tablets to add to your water.
- Active Cooling: Bring a small, foldable USB-powered fan and a cooling towel. Wetting the towel before you start provides significant relief when worn around your neck.
- Timing is Everything: This is the most critical rule. Do not hike between 11 AM and 4 PM. This is the « Danger Zone » when heat, humidity, and sun exposure are at their absolute peak. Start your hike at sunrise (around 6 AM) or late in the afternoon (after 4 PM).
- Emergency Reserve: Always carry an extra 500ml bottle of water that you don’t plan to drink. This is your emergency reserve.
By respecting the climate and adjusting your plan, you can still enjoy the beauty of Dragon’s Back safely, even during the hottest months.
How to Finish Your Hike at Big Wave Bay for a Swim?
After about two hours of scenic ridgeline walking, the trail descends through shaded forest and ends at the beautiful, rustic surf village of Big Wave Bay. The promise of a refreshing swim is a powerful motivator during the final leg of the hike. The transition from sweaty hiker to relaxed beachgoer is surprisingly easy, as the village is well-equipped for visitors coming off the trail.
Your first priority will be to cool off and change. The village provides everything you need. As you enter the beach area, look for the main building which houses the lifeguard station. Here you will find free public showers and changing rooms. They are basic but clean and perfect for rinsing off the trail dust. If you have valuables like a wallet or passport, small coin-operated lockers are available, so it’s wise to bring a few HKD coins with you.
Once you’re refreshed, you can fully embrace the beach vibe. Big Wave Bay is a laid-back spot popular with local surfers, not a polished tourist resort. There are several small beachfront cafes (known as *dai pai dongs*) where you can grab a cold drink, a plate of fried rice, or other local snacks. Don’t worry about being underdressed; it’s perfectly acceptable to eat in your hiking clothes or beachwear. This is the perfect reward for your efforts.
Case Study: The Escape Plan from Big Wave Bay
The final puzzle for any beginner is figuring out how to get back to the city. A recent travel guide outlines a clear, low-anxiety plan. The primary option is the red minibus that departs from the village parking lot. It takes you directly to the Shau Kei Wan MTR station, but it requires cash (around 12 HKD) and you may have to queue on busy days. If the line is daunting, you have an excellent backup plan: walk 10 minutes back up the road to the main Shek O Road junction. From there, you can catch the more frequent double-decker Bus No. 9, which conveniently accepts Octopus card payment.
With a clear plan for showering, eating, and departing, you can fully relax and enjoy the well-deserved prize at the end of the Dragon’s Back trail.
Red vs Green Minibus: Which One Can You Flag Down Anywhere?
Navigating Hong Kong’s public transport is part of the adventure, but the minibus system can seem baffling to newcomers. Understanding the simple difference between the red and green minibuses is a key piece of local knowledge that will boost your confidence immensely. The minibus you’ll take from Big Wave Bay is a red one, and it operates on a different set of rules.
Here’s the most important thing to remember: Red is for Random stops, Green is for Government stops. Green minibuses operate on fixed routes with fixed stops, just like a regular city bus, and you can pay with your Octopus card upon entry. Red minibuses, however, have a more flexible nature. While they have a set route, they don’t have designated stops along the way. You can flag one down anywhere (as long as it’s safe for it to stop), and you can ask to get off anywhere.

This flexibility comes with its own etiquette, which is crucial for a smooth journey back to Shau Kei Wan MTR.
- Memory Trick: ‘Red is for Random stops (and requires cash). Green is for Government stops (and accepts Octopus card).’
- Payment: For red minibuses, you pay in cash upon exiting. Have the approximate fare (around 12 HKD) ready. They often don’t have change for large bills.
- Getting Off: This is the most intimidating part for tourists. The driver does not automatically stop at the MTR station. You need to alert them. As you get close to your destination, you must shout, « Yau lok, m’goi! » (which means « Next stop, please! »).
- Location Tracking: Since stops aren’t announced in English, the best strategy is to track your location on your phone’s GPS. When you see you’re about a block or two away from the MTR station, give the driver a confident shout. They hear it all day and will pull over at the next safe spot.
By understanding these simple rules, you can tackle the red minibus with zero anxiety, adding another authentic Hong Kong experience to your trip.
Is Bowen Road the Best Flat Running Path with City Views?
Choosing the right walk is about matching the experience to your mood and energy level. While Dragon’s Back offers epic coastal panoramas, it requires a moderate climb. What if you want a high-reward view with almost zero effort? For that, Hong Kong offers a fantastic alternative: Bowen Road. This path offers a completely different, yet equally stunning, perspective of the city.
Bowen Road is a mostly flat, paved service road that contours the hillside above the city’s Mid-Levels. It’s incredibly popular with local runners and walkers for its accessibility and fantastic urban views. You get a direct, unobstructed look at the iconic skyline of Central and Wan Chai. It’s the perfect choice for a day when you want some light exercise without committing to a full-on « hike. »
So, how do you choose? It’s a matter of comparing the effort-to-reward ratio and the kind of scenery you’re seeking. The following comparison breaks down the key differences to help you decide which walk is right for you.
| Criteria | Bowen Road | Dragon’s Back |
|---|---|---|
| Scenery Reward vs. Effort | City views with minimal effort | Coastal panoramas require moderate climb |
| Difficulty Level | Flat, paved path | Moderate with 580 ft elevation gain |
| Solitude Potential | Low (popular with runners/walkers) | Moderate (crowded weekends, quieter weekdays) |
| Ease of Navigation | Very easy – single paved road | Easy – well-marked trail with signage |
| Anxiety Score (1-10) | 1/10 – Zero stress | 4/10 – Some steep sections |
| Duration | 1-1.5 hours circular walk | 2.5-4 hours point-to-point |
| Best For | Gentle exercise with urban pulse | Nature escape with epic coastal views |
Ultimately, there’s no « best » path—only the best path for you on a given day. Dragon’s Back is your go-to for a nature escape with ocean views, while Bowen Road is your destination for an easy urban stroll with a skyscraper backdrop.
Key Takeaways
- Confidence over Gear: Success on the Dragon’s Back comes from logistical preparation (water, transport knowledge), not expensive equipment.
- Your Sneakers Are Enough: For this well-maintained trail, comfort and basic grip from your running or travel shoes are more important than the heavy ankle support of boots.
- Trust the System: Hong Kong’s trails are excellently marked in English, and the transport system is reliable once you understand the simple local rules.
How Long Does the Lugard Road Circular Walk Take for a Casual Stroll?
Now that you have the confidence to tackle a coastal hike like Dragon’s Back, let me, as your coach, give you one final « pro tip. » Sometimes the most spectacular reward comes with the least amount of effort. If Dragon’s Back is the premier daytime coastal walk, then the Lugard Road circular walk around Victoria Peak is its nighttime city-lights equivalent. And it’s even easier.
This walk is a stunning, almost completely flat loop that takes you around the summit of Victoria Peak. Official information documents the Hong Kong Trail Section 1, which includes this walk, as covering 7 kilometers in approximately 1.5-2 hours, but the main scenic loop itself can be done at a very casual pace in about an hour. It’s less of a hike and more of a spectacular stroll along a paved, railing-lined path cantilevered from the side of the mountain.
The real magic of Lugard Road is its timing. It offers arguably the best nighttime view of Hong Kong’s famous skyline for free. For the ultimate low-effort, high-reward experience, plan your walk around sunset.
- Magic Hour Timing: Start your walk about 45 minutes before sunset. This allows you to see the city transition from daylight to the golden hour and finally into a glittering tapestry of lights.
- First Photo Checkpoint: After about 15 minutes, you’ll reach a famous west-facing viewpoint looking over the harbour towards Kowloon.
- The Grand Finale: Continue for another 20 minutes to the Lugard Road Lookout. You’ll arrive just as the city lights up, and you might even catch the « Symphony of Lights » show that illuminates the skyline every night.
Now that you are equipped with the confidence and practical knowledge to tackle Hong Kong’s best trails, the only step left is to choose a day, pack your small bag of supplies, and go experience it for yourself.